Installing and Running OLI Engine in UniSim Design On Network
Find OLI Engine for UniSim from this list under Alliance Products:

Go to the location of your downloaded files. Right click on the file, run the executable file as an administrator.

Click Next

Select the radio button for I accept the terms in the License Agreement and click Next

Input your Client Serial number on the following screen for Customer Information : OLI Serial Numbers have the format V2-XXXX-XXXX-XXXX-XXXX-XXXX-XXXX

The following steps regarding the IP address or server binding only apply if you have an LA or LS key.
  If you are installing the software on a different machine from the Network License Manager then you need to input the following information.

  Please input Server Name or IP Address of the machine where License Manager is installed in the IP Address/Host Name section. This has to be obtained from your company's IT department

If you are installing the software on the same computer as the license manager then use the following IP Address 127.0.0.1
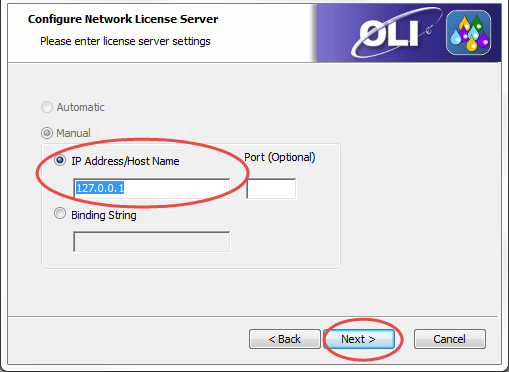

Please note that if you have a firewall, you MUST enter a port number next to the IP Address/Host Name section. This port number can be obtained from your company's IT department.
  Please refer to the following article in order to receive more information about Port Numbers:
  Adding a port number for Firewall
Click Next
Select the Typical install option

Now you are on the Ready to Install section. Click on Install

This will bring you to a Progress window.

Click Finish after you see the following window:

Contents
OLI Engine in UniSim R440
After installing the software your start menu changes slightly.
It is advised that you uninstall the previous versions of OLI Engines associated with UniSim in order to be consistent with the new version.
You can find the OLI Engine under OLI Systems folder:

Notice that there is no version number of UniSim associated with this new entry.
Click the new entry OLI Engine 9.2 for UniSim.
Select the Tools folder
Select the tool OLI Engine Config Tool.

If you receive a message about allowing this program to make changes to your computer, please accept Yes/OK
The OLI Alliance software Config Tool window will pop up as follows:

Linking the OLI Engine to UniSim
Link a Single Version
You can link a particular version of the software. Highlight a version, for our example we will choose UniSim R440.
Click in the Link button to link OLI Engine 9.2 to UniSim R440

Once you click on the link button and select the version, your new UniSim build should be linked to the OLI Engine install you just performed:

Check for Updated configuration file
Clicking this link will poll the OLI Download Web Site for a new version of a configuration file. At some point in the future, Honeywell Technologies will release a new version of UniSim (or change its name). At that time this configuration tool will be easily updated by downloading a small file.

If this is what you want, then you are done and you can click the Close button.
Only show detected or installed products
This check box is used when a non-standard UniSim installation has occurred. OLI may not be able to directly detect the software or an installation script is being written and UniSim was not available. In this case we can link the OLI Engine to a non-existent product for later installation.

Uncheck the Only show detected or installed products box.

As you can see, there are versions of UniSim that are not installed when this picture was taken.
OLI interface inside of UniSim
Once you enter UniSim environment, go to Fluid Packages:
Click Add

Scroll down to find OLI Electrolyte package;

Add OLI and click component list view:

Find the OLI Library Component and select between AQ or MSE framework and add your selected components.

Now you know that OLI is working within UniSim.
Please contact OLI [email protected] if you had any further questions.